Don't miss our spring offer - up to 40% OFF!

5 Things to Check Before Buying a Used Laptop
Learn 5 practical things to check before buying a used laptop, including physical condition, screen, keyboard, ports, battery, Wi-Fi and stress testing.

Buying a used laptop can save you money, but only if you know what to check before handing over your money. A laptop can look good from the outside and still have hidden problems with the screen, keyboard, ports, battery or stability.
At Digitul Computers, testing is an important part of how we assess laptops. If you are buying a used laptop from a private seller, another refurbisher or anywhere else, you should also inspect it systematically instead of simply switching it on and assuming everything is fine.
Here are the five things to check before buying a used laptop, based on the same practical areas we consider when inspecting machines.
1. Check the Overall Physical Condition
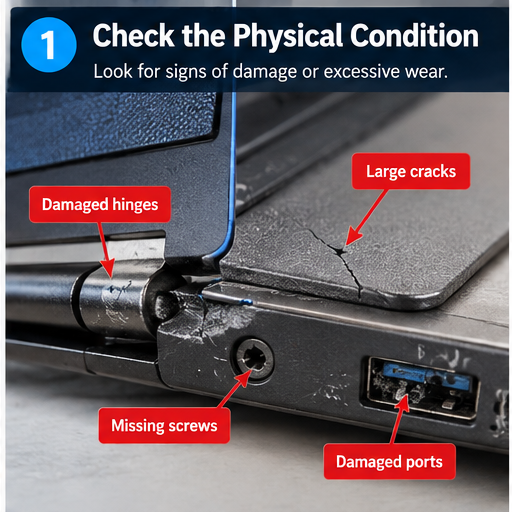
Before switching the laptop on, start with the physical condition. Cosmetic scuffs and minor scratches may be acceptable on a used laptop, especially if the price reflects the condition. However, some physical problems should immediately make you more cautious.
The main red flags we look for include:
- Damaged or faulty hinges
- Large cracks in the casing or body
- Missing screws
- Damaged ports
Hinges are particularly important because they are used every time the laptop is opened and closed. Large cracks or missing screws can also suggest that the machine has been dropped, opened incorrectly or poorly repaired in the past.
Minor cosmetic wear is different from structural damage. A small scuff may simply be part of owning a used laptop. A badly damaged hinge, large crack or damaged connector can lead to a much more expensive problem.
2. Inspect the Screen Carefully
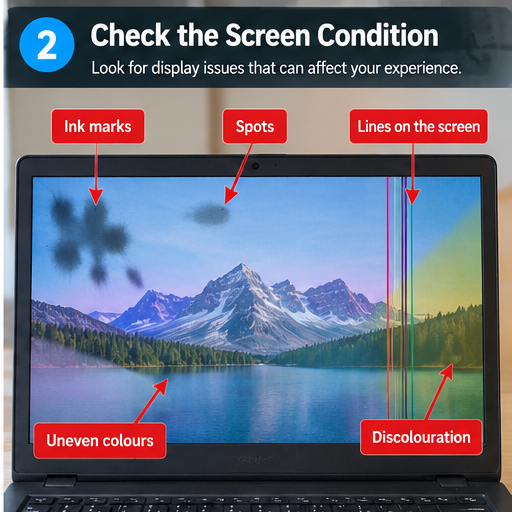
The screen is one of the first things you should inspect carefully. Do not only check whether the display turns on. Look at the entire panel and watch for problems that may become irritating during everyday use.
We look for:
- Ink marks
- Spots
- Lines on the screen
- Uneven colours
- Discolouration
Open a bright image or a plain-colour screen and inspect the display carefully. Some screen problems are easier to notice against a clean background than while looking at a busy desktop or wallpaper.
If the screen has a problem, do not automatically assume the laptop is a bad purchase. Consider the severity of the issue and the cost of replacing the screen compared with the price of the laptop. However, if you are buying a laptop that is supposed to be in very good condition, screen defects should be taken seriously.
3. Test the Keyboard and Built-In Features
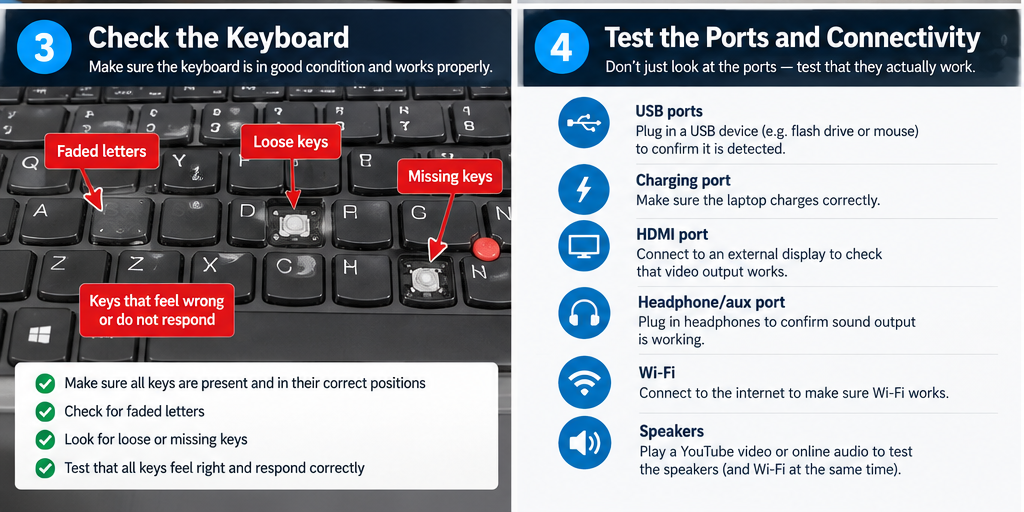
A laptop can boot perfectly and still have an annoying keyboard problem. Do not type only one sentence and assume that every key works. Test the keyboard systematically.
Check that:
- All keys are present.
- All keys are in their correct positions.
- The letters on the keys are not excessively faded.
- No keys are loose.
- No keys feel wrong when pressed.
- No keys are missing.
- Every key responds correctly.
A keyboard testing utility is useful because it helps you work through every key without accidentally missing one.
At the same time, test the laptop’s other built-in features, including the trackpad and camera. Open the camera application and make sure the camera is detected and working properly. Move around the trackpad and check that it responds normally.
4. Test Every Port, Then Check Wi-Fi and Sound
Ports should be tested properly, not just inspected visually. A port may look fine but fail to detect a device when you actually need it.
Our practical checks include:
- Plug a device into the USB ports and confirm that the laptop detects it.
- Confirm that the charging port works correctly.
- Test whether HDMI outputs to an external display.
- Plug in headphones to confirm that the headphone or auxiliary jack produces sound.
For Wi-Fi and speakers, a simple practical method is to connect the laptop to the internet and play a YouTube video. This lets you confirm that the Wi-Fi connection is working and gives you an opportunity to listen to the speakers at the same time.
If you are inspecting the laptop in person, take a small USB device and headphones with you. That makes it much easier to test the ports rather than relying on the seller’s assurance that everything works.
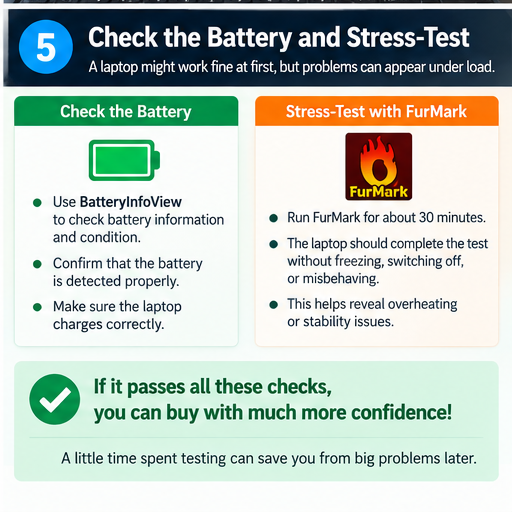
5. Check the Battery and Stress-Test the Laptop
The final check is about how the laptop behaves over time and under load. A machine can appear perfectly normal during a quick inspection but develop problems when it is pushed harder.
Check the battery information and charging
We use BatteryInfoView to inspect battery information and condition. The tool displays details including battery power state, current capacity, full charged capacity and charge/discharge information.
Just as importantly, confirm that the laptop actually charges. Connect the charger and make sure the charging system behaves normally.
You can find BatteryInfoView on the NirSoft BatteryInfoView page.
Run a supervised stress test
For a practical graphics stress test, we use FurMark. FurMark places the graphics hardware under a sustained, demanding workload, which can help reveal instability or cooling problems that may not appear during basic testing.
Our practical standard when assessing a laptop is to let it run for approximately 30 minutes. If it can complete that period without freezing, switching off, crashing or otherwise misbehaving, we are satisfied with the stability shown during that test.
Because FurMark can create a heavy thermal load, stress testing should be supervised and stopped if the laptop shows unsafe temperatures or abnormal behaviour. FurMark itself describes its workload as an intensive GPU stress test and recommends monitoring the system during the run.
You can learn more about the tool at FurMark’s website.
A Quick Checklist to Take With You
- Physical condition: Check hinges, large cracks, screws and port damage.
- Screen: Look for ink marks, spots, lines, uneven colours and discolouration.
- Keyboard and built-in features: Test every key, key condition, trackpad and camera.
- Ports, Wi-Fi and sound: Test USB, charging, HDMI, headphones, Wi-Fi and speakers.
- Battery and stability: Check BatteryInfoView, confirm charging and run a supervised stress test.
Do Not Buy a Used Laptop Based Only on Appearance
A clean-looking laptop is not automatically a good laptop. The same is true in reverse: a laptop with minor cosmetic wear can still be an excellent purchase if it has been properly tested and is working as it should.
The best approach is to separate cosmetic condition from functional condition. Inspect the outside, then test the components you will actually use.
If you want to understand how a properly prepared machine differs from an ordinary used laptop, read our guide: What Is a Refurbished Laptop?.
For help choosing the right specifications and type of laptop for your needs, see our How to Choose the Right Refurbished Laptop guide.
Final Thoughts
Before buying a used laptop, take the time to inspect it properly. Check the physical condition, inspect the screen, test the keyboard and built-in features, test every important port and connection, then check the battery and overall stability.
Switching a laptop on is not enough. A proper inspection can help you discover problems before you buy instead of finding them after you have already spent your money.